
archlinux kde
最进运行 chromium 无法启动 命令行执行chromium 发现报错
获取当前周下周上周日期
/*获取yyyy-mm-dd day天的日期数组
* getDays('2012-11-01',2)
* 返回['2012-11-01','2012-11-02']
*/
function getDays(str, day){
  var   dd, mm, yy;
  var   reg = /^(\d{4})-(\d{1,2})-(\d{1,2})$/;
  if (arr = str.match(reg)) {
    yy = Number(arr[1]);
    mm = Number(arr[2])-1;
    dd = Number(arr[3]);
  } else {
    var d = new Date();
    yy = d.getUTCFullYear();
    mm = ("00"+(d.getUTCMonth())).slice(-2);
    dd = ("00"+d.getUTCDate()).slice(-2);
  }
  var aa=[];
  if(day>=0){
  	for(var i=0;i<day;i++){
  	  aa.push(_getDate(yy, mm, dd, i));
    }
  }else{
    for(var i=(day+1);i<=0;i++){
  	  aa.push(_getDate(yy, mm, dd, i));
    }
  }

  //alert(aa);
  return aa;
}
/*
 *返回n天后的日期
 * get_day("2012-11-01",3) 返回 "2012-11-04"
 *
 */
function get_day(str, n){
	  var   dd, mm, yy;
	  var   reg = /^(\d{4})-(\d{1,2})-(\d{1,2})$/;
	  if (arr = str.match(reg)) {
	    yy = Number(arr[1]);
	    mm = Number(arr[2])-1;
	    dd = Number(arr[3]);
	  } else {
	    var d = new Date();
	    yy = d.getUTCFullYear();
	    mm = ("00"+(d.getUTCMonth())).slice(-2);
	    dd = ("00"+d.getUTCDate()).slice(-2);
	  }

	  var aa=_getDate(yy, mm, dd, n);

	  return aa;
	}

/*
 * 获取day天后的日期
 * 例如_getDate(2012,11,1,2):获取2012-11-01后2天的日期
        例如_getDate(2012,11,1,-2):获取2012-11-01前2天的日期
 */

function _getDate(yy, mm, dd, day) {
    var s, d, t, t2;
    t = Date.UTC(yy, mm, dd);
    t2 = day * 1000 * 3600 * 24; //加减day天的时间
    t+= t2;
    d = new Date(t);
    s = d.getUTCFullYear() + "-";
    s += ("00"+(d.getUTCMonth()+1)).slice(-2) + "-";
    s += ("00"+d.getUTCDate()).slice(-2);

    //alert(s);
    return s;
}

/*这个方法将取得 某日期(nowDate) 所在周的星期几(weekDay)的日期
 * getNextDate("2012-11-04",1); 2012-11-04所在周的星期一的日期
 * 返回2012-10-29
 *
 */
function getNextDate(str,weekDay){
	  var   dd, mm, yy;
	  var   reg = /^(\d{4})-(\d{1,2})-(\d{1,2})$/;
	  if (arr = str.match(reg)) {
	    yy = Number(arr[1]);
	    mm = Number(arr[2])-1;
	    dd = Number(arr[3]);
	  }
	  var t = Date.UTC(yy, mm, dd);
	  var d = new Date(t);
		weekDay%=7;
		var day = d.getDay();
		if(day==0)day=7;//自己加的 否则如果是周日 day=0  我取所在周一的日期,返回的是下周的
		var time = d.getTime();
		var sub = weekDay-day;
		time+=sub*24*3600000;
		d.setTime(time);
		var s = d.getUTCFullYear() + "-";
    s += ("00"+(d.getUTCMonth()+1)).slice(-2) + "-";
    s += ("00"+d.getUTCDate()).slice(-2);
    return s;
}
function getNextDate1(str,weekDay){
	  var d=new Date(str);
		weekDay%=7;
		var day = d.getDay();
		if(day==0)day=7;//自己加的 否则如果是周日 day=0  我取所在周一的日期,返回的是下周的
		var time = d.getTime();
		var sub = weekDay-day;
		time+=sub*24*3600000;
		d.setTime(time);
		var s = d.getUTCFullYear() + "-";
    s += ("00"+(d.getUTCMonth()+1)).slice(-2) + "-";
    s += ("00"+d.getUTCDate()).slice(-2);

    return s;
}
/*
 * 参数 2012-11-08
 * 返回周几
 */
function week(dd){
	dd=dd.replace(/\-/g,"/");
	var week="日一二三四五六".charAt(new Date(dd).getDay());
	return week;
}
/*
 * 获取当前日期
 */
function getCurrDay(){
	var d = new Date();
    yy = d.getUTCFullYear();
    mm = ("00"+(d.getUTCMonth()+1)).slice(-2);
    dd = ("00"+d.getUTCDate()).slice(-2);
    return yy+"-"+mm+"-"+dd;
}
<html>
	<head>
		<meta http-equiv="content-type" content="text/html; charset=UTF-8" />
		<SCRIPT type=text/javascript src="week_day.js"></SCRIPT>
<script type="text/javascript">

function getWeek(flag){
	var start_day="";
	var curr_day=getCurrDay();
	var mon_day=getNextDate(curr_day,1);//当前日期所在周星期一的日期
	if(flag=='本周'){//查询本周
		start_day=mon_day;//当前时间
		d=getDays(start_day,7);
	}else if(flag=='下周'){//下周
		start_day=get_day(mon_day,7);//获取7天后的开始日期
		d=getDays(start_day,7);

	}else if(flag=='下下周'){//下下周
		start_day=get_day(mon_day,14);//获取14天后的开始日期
		d=getDays(start_day,7);
	}else if (flag=='上周'){
	  	start_day=get_day(mon_day,-7);//获取7天后的开始日期
		  d=getDays(start_day,7);
	}
	alert(d);
}

</script>

	</head>
<body>
<button onclick="getWeek('上周')">上周</button>
<button onclick="getWeek('本周')">本周</button>
<button onclick="getWeek('下周')">下周</button>
<button onclick="getWeek('下下周')">下下周</button>
</body>
</html>
GOAGENT又一个基于GAE的穿越利器

此文章来源 http://www.lhzhang.org/
参考了https://code.google.com/p/goagent/
有一些小改动
GoAgent是 一个使用Python和Google Appengine SDK编写的代理软件。部署和使用方法非常简单,不需要安装Python或者Google Appenginge SDK ,几分钟即可搞定。
wuala的CBFS 更新文件

wuala被墙掉了,CBFS无法更新,自己翻墙下载了更新文件,给大家共享
附:wuala 注册邀请链接(需翻墙) http://www.wuala.com/referral/KF4CJ64PM5PFPBF6GBB6
LMDE Update Pack 3 is out!
这个Linux Mint Debian的更新包,如果你没有用这个版本,请跳过
有2个较大个更新:
- 全新的3.0内核
- 包括安全和多媒体库更新.
Changing your repositories
首先要修改Multimedia and Security repositories. 编辑APT源:
gksu gedit /etc/apt/sources.list
- Replace security.debian.org with debian.linuxmint.com/latest/security
- Replace debian-multimedia.org with debian.linuxmint.com/latest/multimedia
Your APT sources, should now look like this:
deb http://packages.linuxmint.com/ debian main upstream import
deb http://debian.linuxmint.com/latest testing main contrib non-free
deb http://debian.linuxmint.com/latest/security testing/updates main contrib non-free
deb http://debian.linuxmint.com/latest/multimedia testing main non-free
Save and close the file.
Using the Update Manager
… to update itself
首先要升级Update Manager。
If you see an update for “mintupdate-debian“, accept it and wait for the Update Manager to restart itself.
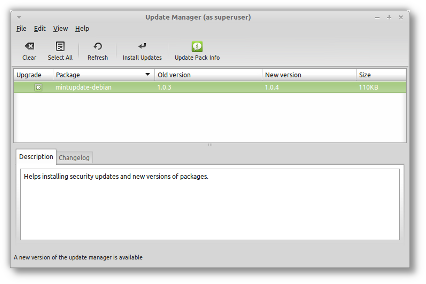
如果Update Manager可以升级,在升级列表里只会显示Update Manager。
… to check your APT sources
目前最新的mintupdate-debian 版本是1.0.4,会检查你的APT源配置是否正确
- 点击 “Update Pack Info” 按钮
- 确定 “Your system configuration” 处显示的是绿色的按钮并且没有任何警告或错误信息
- 如果有警告或错误信息,按照它的提示重新配置,直到没有错误信息
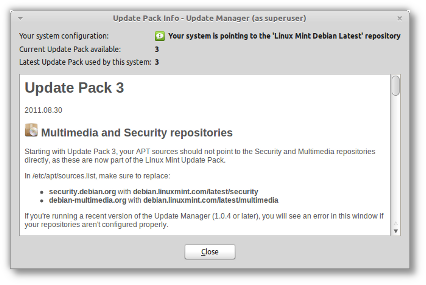
检查系统配置并显示系统配置信息
请仔细阅读Update Pack Info里面的信息
… 开始升级 Update Pack 3
准备好了吧 ![]() 请点击 Install Updates 按钮。
请点击 Install Updates 按钮。
升级期间会有一些提问,有一个非常重要:the new kernel will ask you where to install Grub。Answer with the location of your current Grub menu (which on most systems is “/dev/sda“).
详情请参考:http://blog.linuxmint.com/?p=1836
linux贴纸 unixstickers.com
出售各种开源相关的贴纸(GNU/Linux, Gnome, KDE, Java, MySQL, Apache, PHP, Python, and other Linux distributions)

【pdf】Android_UI开发专题
貌似被墙了啊
is-programmer.com 只能翻墙访问了啊
Android软件汉化 APK软件汉化
来源:http://www.uugo.org/project/Android/71096.html
在Android平台下,程序文件的后缀名为“.APK”,APK是Android Package的缩写,意思是Android安装包,是类似WM系统“.CAB”和Symbian系统“.SIS”的文件格式。APK程序文件可以用WinRAR之类的解压缩软件解压,我们只需要将其中的resources.arsc文件解压出来,用汉化工具将.arsc文件内的英文资源翻译为中文,修改包含英文的图片,再替换原文件,最后将APK文件重新签名即可。
汉化APK软件需要事先下载安装好以下工具:
1.Java
2.解压缩软件:WinRAR
3.汉化工具:AndroidResEdit(需要.NET Framework 2.0支持)
4.图片汉化软件:Photoshop
5.签名程序:Auto-sign(推荐使用AndroidResEdit软件自带的签名功能)
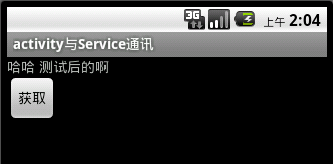
android service 的交互
这个例子演示了activity调用本地服务,点击按钮就会显示结果
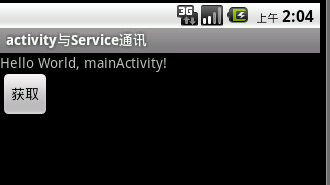
结果:
步骤如下:
1 创建服务接口
服务接口提供了可以调用的方法
IService.java
package com.demo.service;

public interface IService {
	public String getName();
}
2 实现服务
myService.java
package com.demo.service;

import android.app.Service;
import android.content.Intent;
import android.os.Binder;
import android.os.IBinder;

public class myService extends Service {

	/*
	 * binder 起到个桥梁的作用,
	 */
	private MyServiceBinder myServiceBinder = new MyServiceBinder();

	@Override
	public IBinder onBind(Intent intent) {
		// TODO Auto-generated method stub
		return myServiceBinder;
	}

	public String getName(){
		return "你好啊 返回的结果";
	}

	public class MyServiceBinder extends Binder implements IService{

		public String getName() {
			// TODO Auto-generated method stub
			return myService.this.getName();
		}

	}
}
3 调用服务的activity
mainActivity.java
package com.demo.service;

import android.app.Activity;
import android.content.ComponentName;
import android.content.Context;
import android.content.Intent;
import android.content.ServiceConnection;
import android.os.Bundle;
import android.os.IBinder;
import android.view.View;
import android.view.View.OnClickListener;
import android.widget.TextView;

/*
 * service 的交互
 */
public class mainActivity extends Activity {
    /** Called when the activity is first created. */

	private myConn conn=new myConn();
	private IService serviceInstance;

    @Override
    public void onCreate(Bundle savedInstanceState) {
        super.onCreate(savedInstanceState);
        setContentView(R.layout.main);

        Intent intent = new Intent(this, myService.class);
        /*
         * 激活服务 会调用 myConn 返回桥梁 serviceImpl
         */
        bindService(intent, conn, Context.BIND_AUTO_CREATE);

         final TextView nameTextView = (TextView) findViewById(R.id.name);
        this.findViewById(R.id.button).setOnClickListener(new OnClickListener() {

			public void onClick(View arg0) {
				//点击时调用服务中的方法
				String nameString = serviceInstance.getName();
				nameTextView.setText(nameString);
			}
		});

    }

    private final class myConn implements ServiceConnection{

    	/*
    	 * (non-Javadoc)
    	 * @see android.content.ServiceConnection#onServiceConnected(android.content.ComponentName, android.os.IBinder)
    	 * 这个IBinder 是 myServece中的返回的IBinder
    	 */
		public void onServiceConnected(ComponentName name, IBinder service) {
			serviceInstance = (IService) service;

		}

		public void onServiceDisconnected(ComponentName name) {
			serviceInstance=null;

		}

    }

    @Override
    protected void onDestroy() {
    	//退出时 解除绑定
    	unbindService(conn);
    	super.onDestroy();
    }
}